12/27/01
The pictures below show some of the
changes we've made to the chassis. We've been concentrating on making things
lower and lighter.

Here’s what 45 pounds of sheet metal looks like...after it’s been cut
out of a Cougar. This cutting helped, but we’ve still got about 150
pounds to go.
Interior
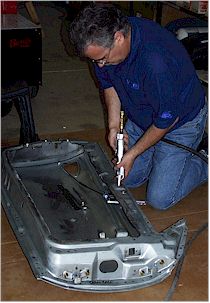 Getting weight out of the car is a big deal...and meeting the rules is equally
important. The rules say you must have a means of opening the door from the
inside. Here Robert is finishing up the installation of the inside door
handles. You can see it next to his left knee...it’s a lever which extends
through the window channel. This solution meets both requirements since we
don’t have any windows left in the doors. Getting weight out of the car is a big deal...and meeting the rules is equally
important. The rules say you must have a means of opening the door from the
inside. Here Robert is finishing up the installation of the inside door
handles. You can see it next to his left knee...it’s a lever which extends
through the window channel. This solution meets both requirements since we
don’t have any windows left in the doors.
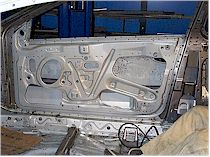 To give you a feel for the lightening process. Here’s the inside of a stock
door. To give you a feel for the lightening process. Here’s the inside of a stock
door.
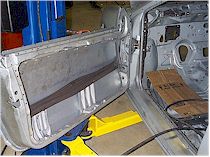 Here’s the same door with only the reinforcement rib left....and 17 pounds
lighter. Here’s the same door with only the reinforcement rib left....and 17 pounds
lighter.
 And
in the pursuit of lightweight, here’s the “door” we’re
running. Only a shell. And
in the pursuit of lightweight, here’s the “door” we’re
running. Only a shell.
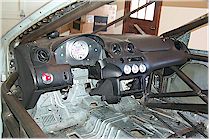 Next
came fitting of the dashboard. Here you see it with the replacement
gauges and master switch installed. A lot more work than it appears. Next
came fitting of the dashboard. Here you see it with the replacement
gauges and master switch installed. A lot more work than it appears.
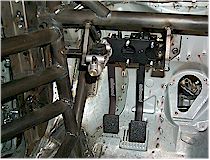 So,
with the cage installed, we can now do the final welding and installation
of the pedals and steering. This shot and the one below shows the
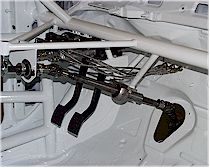
development of the pedal mount and steering shaft support. So,
with the cage installed, we can now do the final welding and installation
of the pedals and steering. This shot and the one below shows the
development of the pedal mount and steering shaft support.
After
the welding of the remaining interior components was completed (or so we
thought), we had our friend Denny Marklein (Marklein Auto Body in
Dodgeville, WI) paint the car white.
 The white keeps the heat down
inside the car and helps identify any plumbing leaks that might arise. The white keeps the heat down
inside the car and helps identify any plumbing leaks that might arise.
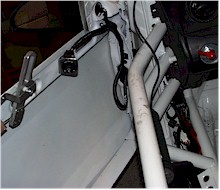
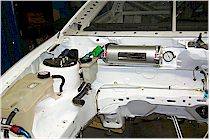 Now we could start mounting components and installing the
plumbing...from brake lines to oil lines. Here you see the Accusump
oil surge tank installed along with the radiator fill tank. Now we could start mounting components and installing the
plumbing...from brake lines to oil lines. Here you see the Accusump
oil surge tank installed along with the radiator fill tank.
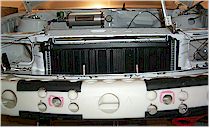 Here you see the oil cooler being installed. Note the lightening
holes in the bumper. Here you see the oil cooler being installed. Note the lightening
holes in the bumper.
Chassis Preparation
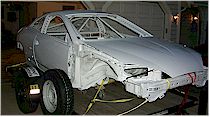
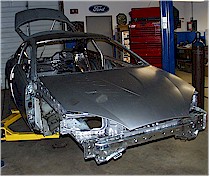 Here
you see the car as we received it -- a “body in white”.
This is where the work starts Here
you see the car as we received it -- a “body in white”.
This is where the work starts
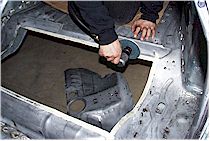
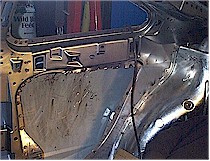 The
next step was to remove excess material to lower the weight. This
shot shows the area between the “B” and “C” pillars
which had all the metal removed...along with the sound deadening material
that lines the inner panels of the car. The
next step was to remove excess material to lower the weight. This
shot shows the area between the “B” and “C” pillars
which had all the metal removed...along with the sound deadening material
that lines the inner panels of the car.
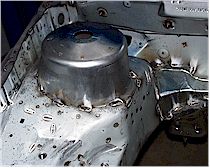 We then “seam welded” the car -- that
is we added additional welds to all the seams of the car that came from
the factory with spot welds. This increases the rigidity of the
car...but it’s a drag to do. Also in this picture you can see the
stock shock tower before modification. We then “seam welded” the car -- that
is we added additional welds to all the seams of the car that came from
the factory with spot welds. This increases the rigidity of the
car...but it’s a drag to do. Also in this picture you can see the
stock shock tower before modification.
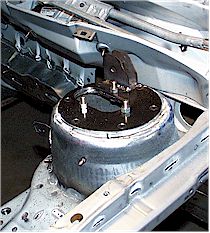 Here’s
the strut tower after modification...with the upper camber plate in
place. Notice we flattened the top of the shock towers to
accommodate a mounting plate. What you can’t see is the
reinforcement plate welded to the underside of the shock
tower. Here’s
the strut tower after modification...with the upper camber plate in
place. Notice we flattened the top of the shock towers to
accommodate a mounting plate. What you can’t see is the
reinforcement plate welded to the underside of the shock
tower.
Fuel Cell
 The
next major step was to cut an opening in the car floor to install the fuel
cell. In addition to making this cut, we constructed a steel tube
cage to support and protect the cell. This cage was welded to the
underside of the car and then covered with an aluminum skin. The
next major step was to cut an opening in the car floor to install the fuel
cell. In addition to making this cut, we constructed a steel tube
cage to support and protect the cell. This cage was welded to the
underside of the car and then covered with an aluminum skin.
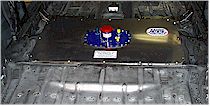 Here’s
the cell dropped into place prior to building the interior cover which
separates the cell from the cockpit. Here’s
the cell dropped into place prior to building the interior cover which
separates the cell from the cockpit.
Roll Cage
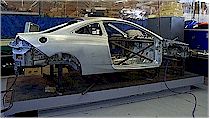 So
after a LOT of cutting and welding, we took the car over to the chassis
builder to get the cage installed. Here’s the car mounted on the
surface plate for construction of the cage. So
after a LOT of cutting and welding, we took the car over to the chassis
builder to get the cage installed. Here’s the car mounted on the
surface plate for construction of the cage.
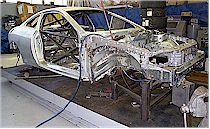 Here’s
another shot of the car on the surface plate as the cage is being
installed. What follows next are detail shots of the cage. Here’s
another shot of the car on the surface plate as the cage is being
installed. What follows next are detail shots of the cage.
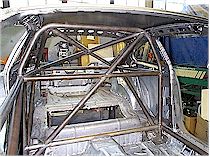 The main hoop of cage. Here you can see the lightened
gussets that connect the cage to the skin of the car. The main hoop of cage. Here you can see the lightened
gussets that connect the cage to the skin of the car.
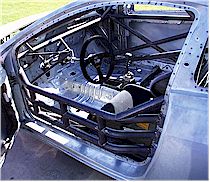
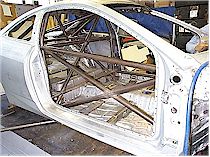 Here’s the cage thru the passenger side door. Here’s the cage thru the passenger side door.
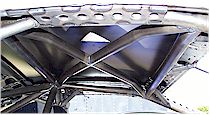 And here is a shot of the “roof” of the cage. And here is a shot of the “roof” of the cage.
 This shot shows the driver's side of the cage with the “NASCAR”
style door bars. This shot shows the driver's side of the cage with the “NASCAR”
style door bars.
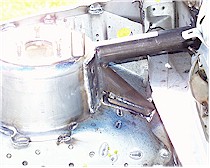
 This
is a close-up of the way the cage connects to the rear strut
tower...providing additional safety and rigidity. This
is a close-up of the way the cage connects to the rear strut
tower...providing additional safety and rigidity.
 And
here’s the same connection at the front strut tower. And
here’s the same connection at the front strut tower.
Exterior
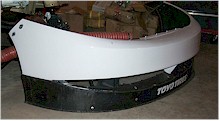
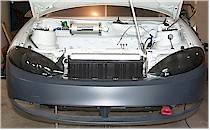 Here you see the headlight covers, front facia
and oil cooler installed. Note the tow hook on the right.. a nice
aluminum swing away bit made by Robert. Here you see the headlight covers, front facia
and oil cooler installed. Note the tow hook on the right.. a nice
aluminum swing away bit made by Robert.
 Here’s
another shot showing the Dzus button mounted facia with the hood closed.
The cardboard is a template for the Lexan replacement of the stock
windshield. Here’s
another shot showing the Dzus button mounted facia with the hood closed.
The cardboard is a template for the Lexan replacement of the stock
windshield.
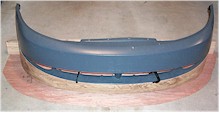
 This
is the front facia with the Wings West air dam mounted on it. We’ve
modified the the air dam to eliminate the lower lip. We replace that
with a custom made splitter/undertray comibnation. This
is the front facia with the Wings West air dam mounted on it. We’ve
modified the the air dam to eliminate the lower lip. We replace that
with a custom made splitter/undertray comibnation.
 Here
you can see the mold Robert made to make the splitter/undertray. The
splitter improves the performance of the air dam. The undertray
extends under the car to the centerline of the front axle. We’d go
farther back, but the rules prohibit that. Here
you can see the mold Robert made to make the splitter/undertray. The
splitter improves the performance of the air dam. The undertray
extends under the car to the centerline of the front axle. We’d go
farther back, but the rules prohibit that.
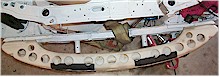 This
shot is looking down at the front of the car. You can see the
lightened stock bumper and the small amount of steel remaining in the
middle of the car. This is the MK2 version...the MK3 will be run in
2002. The short round tubes you see pointing forward, accept the
“legs” of the alignment frame we built. You plug in frames
front and rear and run strings between them...instant reference planes for
doing toe settings. This
shot is looking down at the front of the car. You can see the
lightened stock bumper and the small amount of steel remaining in the
middle of the car. This is the MK2 version...the MK3 will be run in
2002. The short round tubes you see pointing forward, accept the
“legs” of the alignment frame we built. You plug in frames
front and rear and run strings between them...instant reference planes for
doing toe settings.
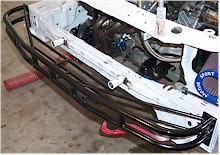 This
is the bumper we’ll run in 2002. This is a tubular aluminum
structure I built toward the end of the 2001 season but never ran.
It's less than 1/2 the weight of the drilled stock bumper
above. This
is the bumper we’ll run in 2002. This is a tubular aluminum
structure I built toward the end of the 2001 season but never ran.
It's less than 1/2 the weight of the drilled stock bumper
above.
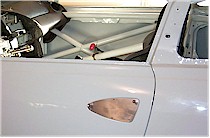 To reduce some weight, we eliminated the stock door handles and covered
the opening with aluminum plate. To reduce some weight, we eliminated the stock door handles and covered
the opening with aluminum plate.
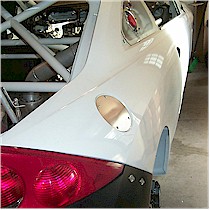 The same goes for the gas filler cap, shown here covered with
aluminum. You can also see the Dzus-buttoned rear facia. The same goes for the gas filler cap, shown here covered with
aluminum. You can also see the Dzus-buttoned rear facia.
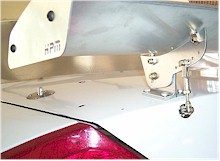 This
is the rear wing mount. As you can see it’s adjustable for
angle. The rules for 2002 allow us to mount the wing higher above
the rear deck...which we’ve done. New picture to follow. This
is the rear wing mount. As you can see it’s adjustable for
angle. The rules for 2002 allow us to mount the wing higher above
the rear deck...which we’ve done. New picture to follow.
|